Hey Hackers!
Alright, you won’t be cannibalized by computers (although some of our jobs might be). There is one field where computers (aka, the innovative application of technology) is making significant strides: Optical Character Recognition, a.k.a. OCR. The advent of improved algorithms for computer vision and NLP skyrocketed OCR’s place within healthcare. Let’s get into it.
I recently uploaded my ID to a health service online, and immediately they pulled out my identifiers (name, date of birth, ID number, etc.)
Wow – I no longer have to spend time typing out this information!
As you can imagine, OCR has an array of potential applications, but insurance eligibility is a topic that stands out as particularly interesting. Imagine this scenario: you sign up for an exciting new online program, and pay the fees, only to find out weeks later that your insurance didn’t cover the service. This could be considerably streamlined with OCR-led automation, leaving everyone that much happier.
In this episode of Healthtech Hacks, we will delve into the fundamentals of OCR, explore its implementation with available services, and discuss possible steps to verify insurance eligibility based on the results.
Access all code here: https://github.com/alearjun/healthtechhacks/
Do you accept my insurance?
If you’re in healthcare, you’ve gotten this question. If your answer to patients is asking them to check their eligibility, this article is for you. Checking eligibility is a painful process for everyone.
Who doesn't love the excitement of verifying whether you're eligible for the medical service you need, or if you're about to get stuck with a massive bill? In the US, health insurance is a massive industry, but most plans don't cover everything under the sun. That's why eligibility checks are so essential. Because let's be honest, it's not like insurance companies want to give away their money all willy-nilly.
To find out whether you're covered for a medical procedure, you could read through the 20-30 page benefits summary that your insurance company provides (which likely doesn’t include all the nuances you need). Who doesn't love spending hours poring over legal jargon trying to figure out what's covered and what's not?
Or, you could try calling your insurance company to ask about your coverage. But be prepared to spend hours on hold and navigate through a seemingly endless menu of options, only to finally reach a representative who may or may not be able to help you.
And let's not forget about the fun-filled eligibility check process itself! You'll need to verify your policy information, personal details, claim information, payment status, and medical information, on top of everything else you need to do every day.
At the end of the day, automating eligibility checks is a game-changer for the healthcare industry. It 1. saves time and 2. reduces errors for both patients and healthcare providers.
The benefits of automating eligibility checks are clear
Automated eligibility verification ensures that patients can access the medical services they need without surprise bills, while healthcare providers are justly compensated for their services.
Automation can allow patients to effortlessly determine their insurance coverage for medical services without having to sift through complicated policy documents or wait on hold for customer service. They can simply input their details into a web-based tool or app and receive immediate information about their coverage.
Healthcare providers also benefit from automated eligibility verification as it streamlines the billing process and guarantees the accuracy and timeliness of submitted claims. By reducing administrative tasks, staff can focus more on providing quality patient care.
Implementing a photo to eligibility pipeline
Make it as easy as possible for users to sign up for your digital health practice. Users like to do as little as possible. offering eligibility checks could increase patient activation from the get-go.
When users manually fill out information, you could run into issues as well. What if they type a character wrong? They’ll come back as ineligible and leave your program. Or perhaps they’ll be frustrated, associating that frustration with your program instead of with the insurance carrier, leading to a lower likelihood of retention.
Let’s take a look at how we can solve these problems with OCR.
How do computer eyes work?
Optical Character Recognition (OCR) works by converting images or scanned documents into digital, editable text, by understanding the shapes of each letter.
Optical Character Recognition (OCR) technology works by converting images of text or documents into digital, editable text and then utilizing complex algorithms and artificial intelligence to analyze the shapes and patterns of the text in an image. It then translates these patterns into recognizable characters and words.
When you see the letter X, you automatically understand it as the letter X. You see the patterns of the two lines, and your brain “matches” that to the concept of the letter X. A simple OCR system works similarly, by pattern matching the letter’s shape to stored templates. Modern systems, like AWS Textract, also implement intelligent OCR (or ICR) which uses machine learning models to more deeply analyze characters to understand hand-written text. At one step above, intelligent word recognition (IWR), uses the same processes to pull whole words out of text.
OCR/ICR have been implemented across various industries to improve user flows and interactions with apps. For example, here’s a great article from Dropbox Tech on how they implemented OCR for document scanning.

There are 5 main steps to OCR/ICR:
Preprocessing improves image readability, like turning up the brightness on your phone when it’s sunny outside. Resizing, removing noise, adjusting brightness and contrast, and converting the image to grayscale or binary (black and white) format are all strategies that may be employed. For a great overview of types of preprocessing, see Tesseract’s guide here.
Text segmentation breaks the text into each element. OCR systems typically start by identifying the line of text, breaking these into words, and breaking each word into characters.
Feature extraction splits each character into its various parts such as the contours, strokes, and junction points of the character.
Character recognition uses neural networks to match the extracted features of each character with a predefined set of characters. OCR algorithms are trained on large datasets of labeled characters to recognize various fonts, styles, and languages with high accuracy.
Post-processing helps to correct errors or inconsistencies, like spell-checking, correcting homophones by using NLP to understand the context or using NLP to improve the overall comprehension of text.
You could train your own OCR system, but there are a wide array of OCR solutions available that you can use out of the box like OpenCV, Google Cloud Vision, and AWS Textract. We’ll be comparing three options side by side in this example.
OCR in action: 3 different methods
We’ll run through the three routes you can use via a Jupyter Notebook. You can find all of the code you need to run this example here: <>
OCR Notebook setup
Let’s start with installing and importing the packages we need:
#Install necessary packages
!pip install opencv-python

!pip install pytesseract
!apt install tesseract-ocr -y #required for package installation

!pip install boto3
!pip install google-cloud-vision
!pip install pandas
#Import necessary packages
import cv2
import numpy as np
import pytesseract
import boto3
from google.cloud import vision
from google.oauth2 import service_account
import pandas as pdWe’ll then load our three test images and read them using OpenCV:
image_paths = ["image1.jpg", "image2.jpg", "image3.jpg"]
images = [cv2.imread(path) for path in image_paths]
I created the images using the iPhone image size ratio of 16:9 to simulate users taking a photo with their phone, as you can see below:
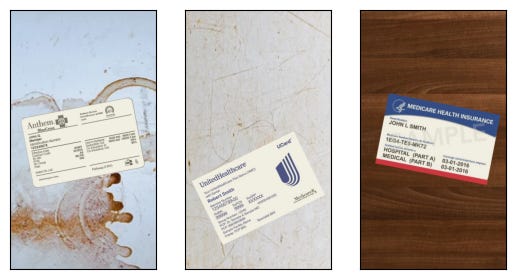
Image Preprocessing
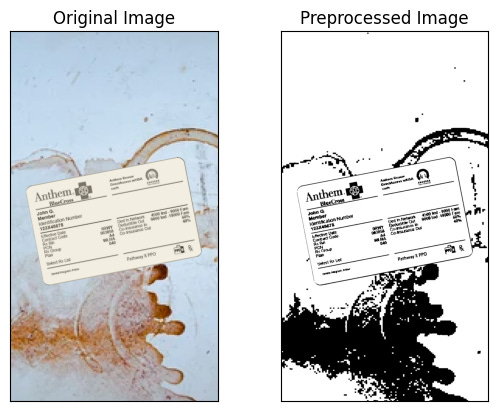
AWS Textract and Google Cloud Vision include preprocessing as part of their pipeline; however, Tesseract recommends pre-processing to improve image quality before OCR. We’ll do a very basic version of pre-processing for all of our insurance cards. In this case, we’re converting the image to grayscale and doing some basic binarization.
def preprocess(image):
   gray = cv2.cvtColor(image, cv2.COLOR_BGR2GRAY)
   thresh = cv2.threshold(gray, 0, 255, cv2.THRESH_BINARY | cv2.THRESH_OTSU)[1]
   return thresh

preprocessed_images = [preprocess(image) for image in images]
Here I’ve displayed the original image next to the preprocessed image :
Defining functions for each method
Now let’s create a function for each of the methods we’re using. Make sure to replace ‘your_region’, ‘your_access_key’, and ‘your_secret_key’, as well as ‘your_key_file.json’ before running any code.
# tesseract

def extract_text_tesseract(image):
   config = "--psm 6"
   text = pytesseract.image_to_string(image, config=config)
   return text

tesseract_results = [extract_text_tesseract(image) for image in preprocessed_images]
# AWS textract
def extract_text_textract(image):
client = boto3.client('textract', region_name='your_region',
aws_access_key_id='your_access_key', aws_secret_access_key='your_secret_key')
_, encoded_image = cv2.imencode(".png", image)
response = client.detect_document_text(Document={'Bytes': encoded_image.tobytes()})
text = " ".join([item["Text"] for item in response["Blocks"] if item["BlockType"] == "LINE"])
return text
textract_results = [extract_text_textract(image) for image in preprocessed_images]# GCP vision
def extract_text_gcloud(image):
credentials = service_account.Credentials.from_service_account_file('your_key_file.json')
client = vision.ImageAnnotatorClient(credentials=credentials)
_, encoded_image = cv2.imencode('.png', image)
response = client.document_text_detection(image=vision.Image(content=encoded_image.tobytes()))
text = response.full_text_annotation.text
return text
gcloud_results = [extract_text_gcloud(image) for image in preprocessed_images]We can then display the results for each method:
data = {
   "Image": image_paths,
   "Tesseract": tesseract_results,
   "Textract": textract_results,
   "GCP Vision": gcloud_results,
}

df = pd.DataFrame(data)
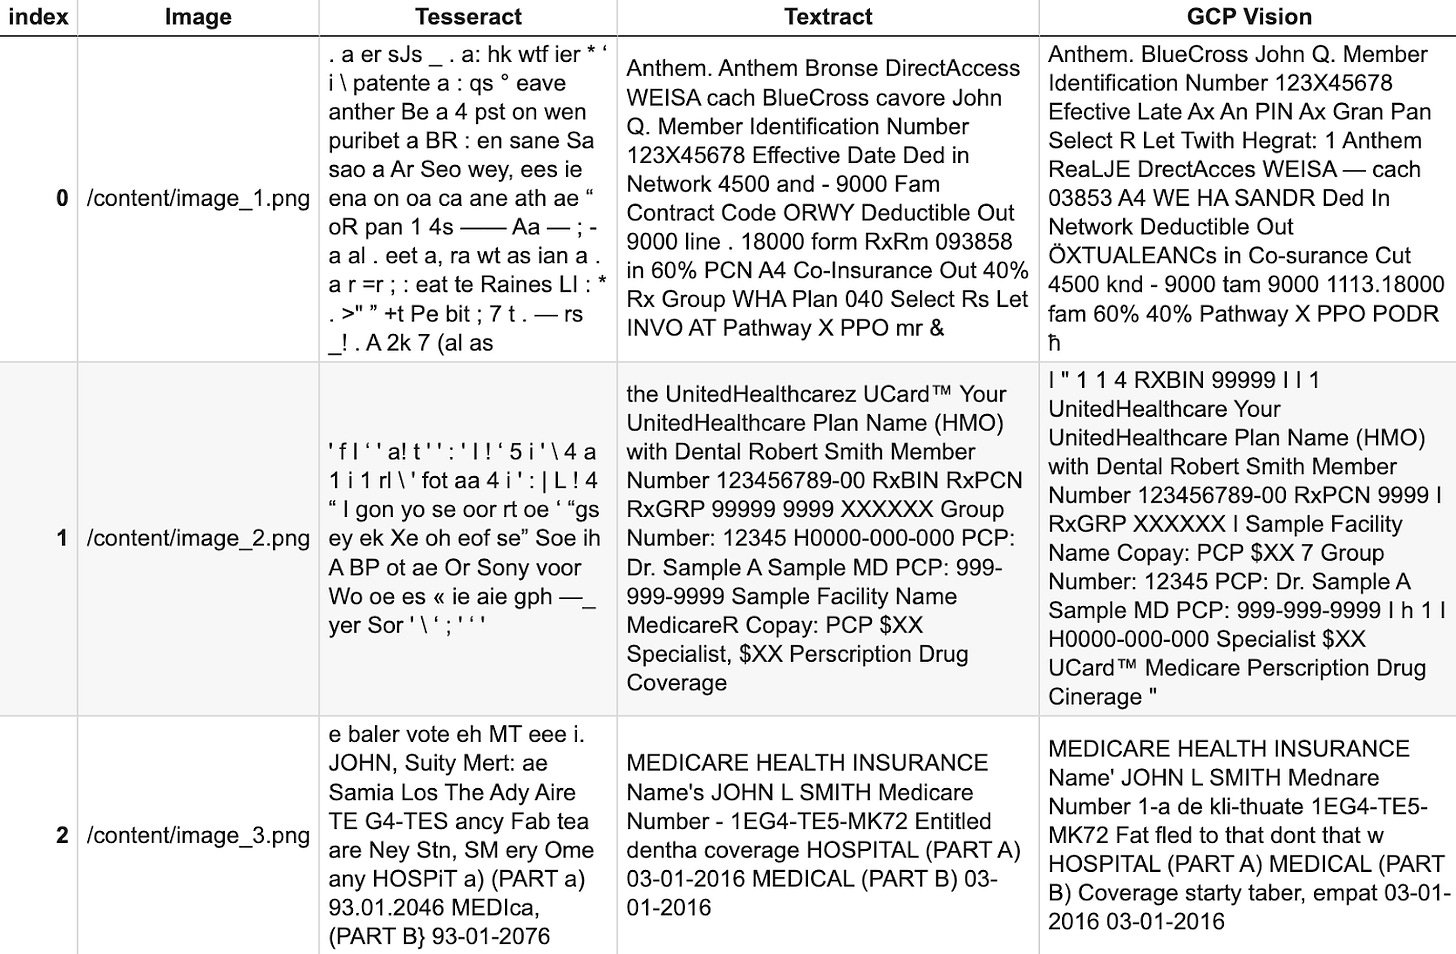
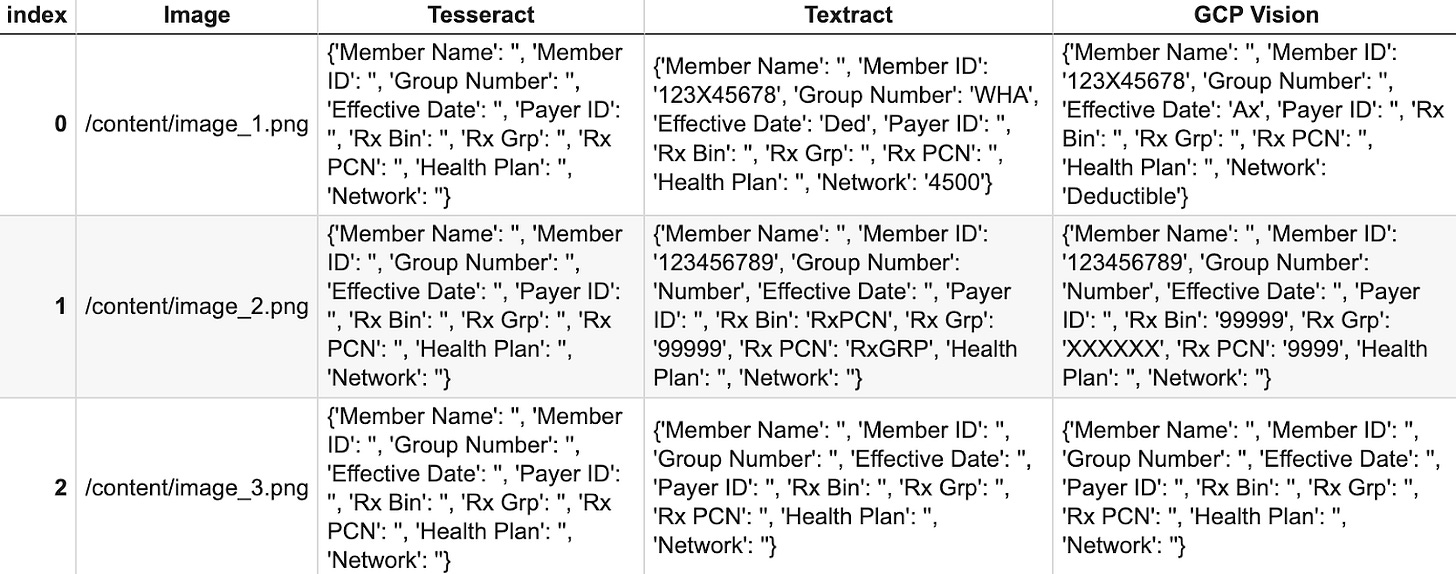
dfBased on these results, we cly see that in this use case, Textract performs the best at pulling out the relevant text information, but performs comparably well to GCP Vision. To maximize Tesseract’s effectiveness, we’d likely need to improve our pre-processing flow (recall that Textract and Vision already include pre-processing, which in part explains their effectiveness. Textract and Vision are both managed services, so it is important to note they’d be more expensive than using Tesseract.
Extracting key insurance information from the text
Let’s now extract the key fields we need from the text in each method for each card:
def parse_insurance_card(text):
   extracted_info = {
       'Member Name': '',
       'Member ID': '',
       'Group Number': '',
       'Effective Date': '',
       'Payer ID': '',
       'Rx Bin': '',
       'Rx Grp': '',
       'Rx PCN': '',
       'Health Plan': '',
       'Network': ''
   }


   # Split the text into lines
   lines = text.split('\n')


   for line in lines:
       # Try to split the line into a key and value
       parts = line.split(':')
       if len(parts) < 2:
           continue


       key = parts[0].strip()
       value = parts[1].strip()


       # Check if the key matches any of the keys we're looking for
       if key in extracted_info:
           extracted_info[key] = value


   return extracted_info


tesseract_parsed = [parse_insurance_card(text) for text in tesseract_results]
textract_parsed = [parse_insurance_card(text) for text in textract_results]
gcloud_parsed = [parse_insurance_card(text) for text in gcloud_results]


data = {
   "Image": image_paths,
   "Tesseract": tesseract_parsed,
   "Textract": textract_parsed,
   "GCP Vision": gcloud_parsed,
}
df = pd.DataFrame(data)
df
When I first tried this, the results were abysmal. That’s because the official examples for Textract assume highly regular text. As you can see in the code, we’re assuming the OCR results will be standardized in key-value pairs separated by colons (e.g. Member Name: Alexander Singh). However, this is often not the case. When searching for exact text, we’ll often fail to pull out critical information – in fact, this method returned only 1 correct field out of the total fields across all three examples and methods (see below).
We can implement Regex to get better results.
# Define a list of regex patterns for each piece of information
# add to def parse_insurance_card(text) function

   patterns = {
       'Member Name': r'(Member|John Q.|Robert Smith)',
       'Member ID': r'(\bMember Identification Number\b|\bMember Number\b|\bIdentification Number\b)\s*(\w+)',
       'Group Number': r'(\bGroup Number\b|\bGroup\b)\s*(\w+)',
       'Effective Date': r'(\bEffective Date\b|\bEfective Late\b)\s*(\w+)',
       'Payer ID': r'(\bPayer ID\b)\s*(\w+)',
       'Rx Bin': r'(\bRXBIN\b|\bRx Bin\b)\s*(\w+)',
       'Rx Grp': r'(\bRxGRP\b|\bRx Grp\b)\s*(\w+)',
       'Rx PCN': r'(\bRxPCN\b|\bRx PCN\b)\s*(\w+)',
       'Health Plan': r'(\bYour UnitedHealthcare Plan Name\b|\bPlan Name\b|\bHealth Plan\b)\s*(\w+)',
       'Network': r'(\bNetwork\b)\s*(\w+)'
   }

   # Search for each pattern in the text

   for key, pattern in patterns.items():
     match = re.search(pattern, text, re.IGNORECASE)
     if match and len(match.groups()) >= 2:
       extracted_info[key] = match.group(2)

   return extracted_info
As you can see, we get better results, but still nowhere near the results we need.
Another route we can try is to use NLP, such as an LLM with the extracted text as context. Alternatively, AWS offers a tool called AWS Textract Queries which uses NLP to provide results based on the context of the text. AWS has an example you can follow here for this.
Improved Extraction with AWS Textract Queries
We provide Textract Queries with the set of queries we’re looking for. After parsing the results, we clearly see that this method provides better output.
documentName = '/content/image_2.png'
response = None
with open(documentName, 'rb') as document:
   imageBytes = bytearray(document.read())


   # Call Textract
   response = client.analyze_document(
   Document={'Bytes': imageBytes},
   FeatureTypes=["QUERIES"],
   QueriesConfig={
       "Queries": [
           {"Text": "What is the member name?", "Alias": "Member Name"},
           {"Text": "What is the member id?", "Alias": "Member ID"},
           {"Text": "What is the group number?", "Alias": "Group Number"},
           {"Text": "What is the effective date?", "Alias": "Effective Date"},
           {"Text": "What is the payer id?", "Alias": "Payer ID"},
           {"Text": "What is the rx bin?", "Alias": "Rx Bin"},
           {"Text": "What is the rx group?", "Alias": "Rx Grp"},
           {"Text": "What is the rx pcn?", "Alias": "Rx PCN"},
           {"Text": "What is the health plan?", "Alias": "Health Plan"},
           {"Text": "What is the network?", "Alias": "Network"}
       ]
   }
)
The output, which we can see matches the information presented on the insurance card:
Using insurance information to check eligibility
Now, if you want to use this information to submit to a plan alongside a service code for a procedure or visit you plan to do with the patient, or drug information to check for coverage, there are a few options.
First, this pipeline should show the information back to the patient for them to verify the information is correct; otherwise, your automated flow will create more headaches than it solves.
In order to submit the eligibility check, you can use multiple options:
Change Healthcare’s Eligibility API
Availity’s Coverage API
My The computer’s eyes deceive me
100% CV accuracy isn’t here yet, but it’s fast approaching. Tools that use OCR to parse insurance and other ID information are extremely helpful to automating different aspects of healthcare, but shouldn’t be relied on independent of human review. As shown in this example, it’s also important to remember that a lot of tools are trained on perfect examples. When we add rotations and simulate dirty environments or bad photos, it becomes harder to get perfect results.
At the end of the day, these tools are great to minimize your time spent on repetitive tasks and boost your offering’s efficiency. And, keep your eyes 👀 open as OCR continues to get smarter.




Awesome article! Thanks for writing Alex. I could just imagine in the future someone uploading their insurance card to their phone and simply saying: "Hey Siri, am I eligible for such and such medical service?"